
tl;dr Bind Command + “j”, “k”, “l”, and “;” to the cursor movement keys for a more fluid, productive text editing experience on MacOS.
(For the impatient: Jump straight to the implementation)
I recently read a great post by Jamie Buelta titled “Vim speed is not really the point“. In the post, Jamie argues that the benefit for investing the time to install Vim or Emacs keybindings into your muscle memory is not because it makes you a faster coder but because it allows you to focus more of your conscious mind on the logic of programming and less on the administrative thoughts like: “how do I get the cursor to the beginning of that word”. Jamie’s point is that speed is not the goal but rather, it’s the feeling of calm control that is the real reward for all the hard work that you put into learning your code editor.
With that idea in mind I’d like to share with you a rather unusual keyboard binding scheme on MacOS that I find very comfortable and efficient and which helps me to compose text without thinking to much about the mechanics of moving the cursor. This works for all native Mac apps and, with some additional finagling, Emacs too.
The Basics
The basic concept is to bind the cursor movement keys to Command + “j”, “k”, “l” and “;”. This is an idea as old as dirt but I’ve never see anyone implement it MacOS-wide. The obvious benefits of this approach is that it allows you quickly move the cursor while keeping your hands comfortably on the home row in any MacOS app, dialog box, etc.
I’m not sure exactly where the inspiration for this came from but if you’ve ever used vi or WordStar you’ll find this quite familiar. I’ve been using it for many years and I’ve found it works well across many different scenarios whether you’re typing email, blog-posts or coding.
I’ve found that the best configuration for me is to bind “j” to left, “k” to down, “l” to up and “;” to right. Vim users will probably be screaming at the sacrilege but hey, that works best for me (and I’m not a regular vim user so it doesn’t conflict with my muscle memory). If you ARE a regular Vim user then just go ahead and modify the instructions below to your liking, k?
Other Useful Bindings
Moving by word is achieved by pressing Command and Option together with “j” and “;” respectively. I like this because you can very quickly “zero-in” on the character you want to edit by holding or releasing the option key as you get closer to the point you’re seeking towards. It sounds complicated but it ends up being really easy to learn and integrate.
I’ve bound “move to beginning of line” and “move to end of line” to Command + “h” and Command + ‘ (single quote) respectively. It may seem weird to use the single quote character but it feels very natural and I almost never hit the enter key when I’m trying to hit Command + ‘. I should mention here that I chose these keybindings because I felt they were ergonomic and corresponded to the direction of the cursor movement and specifically NOT because the first letter was a mnemonic for the command (YMMV).
Another binding I find useful and use all the time is Command + Option + “k” which is bound to PageDown and Command + Option + “l” which is bound to PageUp. This is especially useful on my MacBook because I always forget where Apple hid the PageUp and PageDown keys (it’s bound by default to Fn + Up Arrow).
Selecting Text
Pressing Shift with any of these combinations allows you to select words. For example, holding Command + Option + Shift and tapping “j” selects by word to the left and Command + Option + Shift + “;” selects by word to the right. “Command + Option + Shift” sounds like a horrendous key combination but it’s actually pretty comfortable if you press the Command key with your left ring finger, Shift with your left pinky and the Option key with your thumb (curled under slightly). Reading the previous sentence aloud still makes it sound pretty horrific but I encourage you to give it a try for a couple of days and then if you still don’t like it THEN you can flame me.
An aspect of this setup that I like is that all modifiers are under your left hand while the movement keys are under your right hand. This avoids the awkward (to me anyway) left-hand or right-hand only keybindings like Command + “a” and Command + “e”.
Details and Implementation
To implement this scheme I use the excellent Keyboard Maestro which at $36.00 US is a steal for all the features it provides. If you are a productivity junkie like me you’ll just love everything that Keyboard Maestro can do for you. You can also the free and open source KeyRemap4MacBook to achieve the same goals but it’s trickier to setup. In this post I’ll show you how to setup this scheme up using Keyboard Maestro.
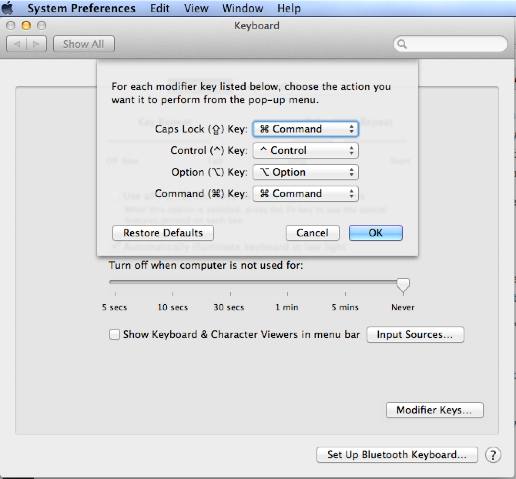
Firstly, an important element of this setup is to swap the Caps Lock and Command keys. You could achieve the same basic result by leaving the command key in the default location next to the space bar but it would make “move by word” and selecting text a lot more difficult (plus you would loose some geek-cred).
Go to System Preferences -> Keyboard -> Modifier Keys and choose Command next to the Caps Lock drop-down:
MacOS Keyboard Preferences
This means that you’ll give up your Caps Lock key but frankly, I’ve never missed it myself (there are ways around this problem but that will be for a future post).
Next, create a group in Keyboard Maestro called “Movement Keys”. This will allow you to easily turn these shortcuts on and off.
In the “Movement Keys” Groups, tap the “new action” button and choose Interface Control -> Type a Keystroke
In the simulate keystroke box tap the right arrow key. You should have the following in Keyboard Maestro:
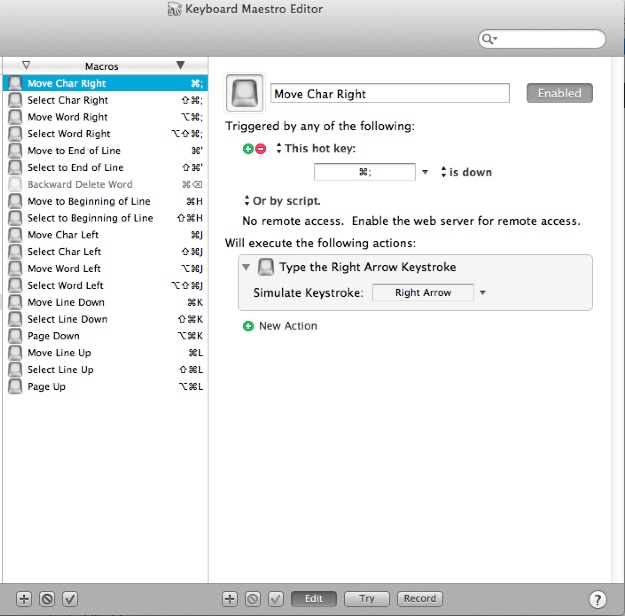
Keyboard Maestro Editor
Repeat the above with the following bindings and enjoy the sweet, sweet taste of lightning fast text editing!
| Macro Name | Hot Key | Simulate Keystroke |
|---|---|---|
| Move Char Right | Command ; | Right Arrow |
| Select Char Right | Command Shift ; | Shift + Right Arrow |
| Move Word Right | Command Option ; | Option + Right Arrow |
| Select Word Right | Command Option Shift ; | Option + Shift + Right Arrow |
| Move Char Left | Command j | Left Arrow |
| Select Char Left | Command Shift j | Shift + Left Arrow |
| Move Word Left | Command Option j | Option + Left Arrow |
| Select Word Left | Command Option Shift j | Option + Shift + Left Arrow |
| Move Line Down | Command k | Down Arrow |
| Select Line Down | Command Shift k | Shift + Down Arrow |
| Move Line Up | Command l | Up Arrow |
| Select Line Up | Command Shift l | Shift + Up Arrow |
| Beginning of Line | Command h | Command + Left Arrow |
| End of Line | Command ' | Command + Right Arrow |
| Page Up | Command Option l | Page Up |
| Page Down | Command Option k | Page Down |
Files
Here’s a zipped copy of my keyboard movement file for Keyboard Maestro. To install click the Keyboard Maestro icon in the toolbar, choose “Launch Keyboard Maestro Editor”, File -> import macros and select the file.
Caveats
This scheme is really only good for touch typists who want to keep their hands on the home row.
This scheme also overwrites some other common key bindings (e.g. Command + l is “go to location” in Chrome for example). I’ve got around this problem by rebinding those often used to keys off the home row (the u,i,o, and p keys work best in my experience). Since Keyboard Maestro allows you to scope keybindings to each application this ends up working very well and you can reuse the same keys in different apps. Happy editing!